Latest Posts

Last month, my son celebrated another year of his young, happy life. I can't believe I have a four-year old now!

And since he is very vocal about his likes and dislikes (yes, that's how toddlers are), he especially requested for an Avengers themed birthday party!

And because this mama loves to DIY parties, I happily obliged to his request. This time, we planned a simple get-together at home. And since our condo unit is just small, we only invited a few neighbours and family.

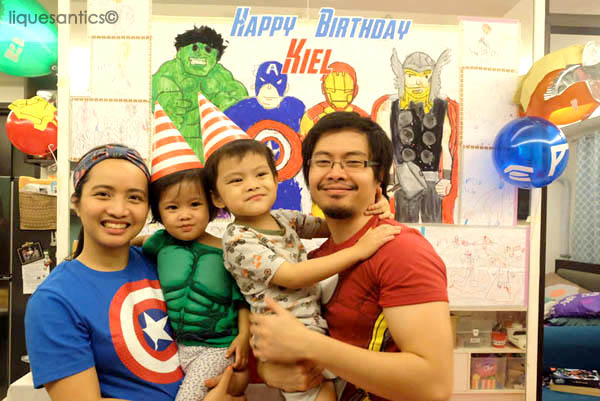
For decorations, we simply made this poster together :) And those drawings surrounding the poster are Kiel's drawings we've collected over time (yes, that's how much he loves the Avengers).


The happy little kid seems satisfied with his party preps

Little sis is dressed as Hulk :D

Here is the Little Captain America himself in costume!
I also arranged a space for the kids to play. Our kiddie shelves were turned and became makeshift benches.


For the food, we just ordered from McDonald's because Kiel originally wanted to celebrate at McDonald's but I made a deal with him to just celebrate at home since we only had a few guests.

I prepared a few snacks. The Thor treats were little mjolnirs made from pretzel sticks and marshmallows. Captain Snacks were chocolate treats, and the Ironman drinks were Avengers themed too, which we bought at the grocery.

We were also expecting guests later that night, so we ordered a Monster Pizza from Jugno's to add to our food.


Our Avenger's cake is from Red Ribbon. It's a chocolate cake with marshmallow icing, which we also served to our guests. Although I was a little disappointed because I thought the photo would fill the entire 12x18" of the cake. We compensated by putting Kiel's mini figures around it instead.


As for the loot bags, my husband just bought Avengers themed prizes from Toy Kingdom - activity pages, coin banks, puzzles, notepads. And I added some cookies and chocolates in the loot too. The tags were made by yours truly, printed here at home :)


Overall it was a happy celebration. The most important thing was, Kiel had a lot of fun that day, and we celebrated it on the actual day of his birthday!




_______________________________________________________

Here are the short list of suppliers that helped make our Avengers Party a success:

  • Cake - Red Ribbon 12x16x3" (Boy Stripes Cake - we emailed the photo to use for the cake)
  • Food - McDonald's Commonwealth (Near Puregold - We ordered directly at their branch)
  • Monster Pizza - Jugnos (QC Branch - 935-3548 / 0905291759 / 09225224629) Just remember to order at least 3-4 hours earlier so they can accommodate your order
  • Snacks and Chocolate Milk Drinks - Supermarket
  • Loot and Balloons - Toy Kingdom
  • Party Hats - Celebrations at Party Central (Megamall)
  • Captain America Costume - SM Department Store
You can also check out the Pinterest Board I made here to check out some other Avengers party ideas!
Follow Lique's board Avengers Party on Pinterest.

post signature"

It's November...already?!

Time flies by quickly, doesn't it? Just a few days after it will be December already, and pretty soon, we'll all be celebrating Christmas!

I'm sure you've started decorating for the holidays, even just a little bit, to get you into the Christmas spirit. We've started early as October decorating for Christmas in our household.

I'd like to share with you this simple DIY craft we did with our tissue cardboard tubes. I was meaning to use them for some arts and crafts projects for the kids, so I kept a stash. One day, I just thought of finally using them and make Christmas ornaments :) It was also about time we had a little change in our decorations anyway. So instead of buying new ones, we did this:

1. Materials: We gathered some tissue cardboard tubes, some poster paint, left over cloth and felt, pompoms and pipe cleaners.


2. We started painting the tubes with poster paint. We each made Santa, an Angel, a Snowman, and a Reindeer.


The little boy is painting a snowman...


3. Let the paint dry and then add some details using left over cloth and felt, and some pipe cleaners. We used the cloth for scarves and Santa's hat, the felt for the brim in Santa's hat, Snowmen hats, and the Angels' wings, the pompoms for reindeer noses and Santa's hat (again, hehe), and the pipe cleaners we're used as reindeer antlers, angel halos, snowmen noses, and loops at the back so we can hang the ornaments.


4. Finish by drawing faces and outlining using a black pentel pen. Kiel drew most of the faces, while I made the outlines. 


5. And then you can finally hang them on the tree


Kiel was very happy to have made this, and he feels very proud seeing them up in the tree, knowing that we made them together.

How about you? Do you have any Christmas saving crafts or hacks you'd like to share too?

If you like our little project, we'd love to get some feedback in the comments below.

Pin this project for later, plus see some other Christmas crafts ideas:
Follow Lique's board Christmas crafts ideas on Pinterest.

Happy Holidays!
post signature

Hello again!

It's been a while since I posted about our homeschooling journey here. Honestly, we have been skipping most of our lessons, the ones I try to plan every week for us, mainly because we've been yaya-less (no helper/nanny) for 4 months and counting now. It's harder to keep up even with a routine, because I have my 1-year old to look after and breastfeed while also cooking and cleaning around the house. 

Nevertheless, I make sure we do our read alouds and story time before nap time, and we do some worksheets or activities at least 10-20 minutes a day. And the one thing we never forget to do is our arts and crafts time, which we all love. Yes, sometimes my 1-year old joins in, she mostly just copies her kuya, hehe.

I previously shared about our simple approach to the Letter of The Week Curriculum, and how we enjoy doing our Art projects. I have also mentioned this in my article in The Learning Basket: Learning Through Play. I admit, I may have strongly influenced my children in my love for Art as we mostly do drawings and doodles, coloring and painting, and DIY crafts. Why not? It's a lot of fun! And it serves as distraction from my work and chores, hehe...

So let me share with you our complete Letter of the Week Projects.

You may notice how we tried different media and materials, because I want it to be something new every time we do our projects. We tried:

  • Painting: with q-tips, paintbrush, fingers
  • Cutting and pasting
  • Drawing and Coloring
  • Stamping
  • Lacing (particularly with letter Y)
  • Crafts

Alphabet introduction: finger painting letters

I also introduced his nickname, he had fun using stamps

Letter A involved cutting and pasting

Letter B butterfly and bee

Letter C cat and caterpillar

Our dotted D dinosaurs

Our Eagle on an Egg (made from eggshells) and elephant

Letter F fence (from popsicle sticks), finger-painted frog and a fly

Letter G Garden and grass. The small g grapes made from stamping bottle caps

Letter H house and horse. Kiel had fun with the house, and played for a few minutes with it, just because he was fascinated with the flap-open windows and door

Letter I island and indian. Kiel showed his early drawing skills here, he drew Jake and the Neverland Pirates and Captain Hook

Tried out crafts this time, with our letter J jellyfish and jack-in-the-box

Letter K kite, Kiel, and kangaroo

We gathered leaves and colored over them for letter L.
And made a little lamb craft with crumpling crepe paper

Letter M mountain, moon, mouse, and monkey

Letter N night and nest. Kiel insisted on writing the labels himself, and I just helped him by spelling them out

Letter O octopus and owl

Letter P pirate and penguin

Letter Q queen and quail

Letter R rabbit and rainbow

Letter S spotted snake and seahorse, with seaweed and shells

Our watercolor tree and tiger (outlined by pens)

Letter U umbrella and Up

Letter V vegetables and vase

Letter W watermelon and worm

X is for X-ray. We made a pretend one by tracing his feet and arm, and pasted q-tips as pretend bones

For Y, we tried lacing yarn

Letter Z zebra and zigzag

Art projects help develop fine motor skills in young children, which helps them further to develop the tripod grip (pencil grasp) so they can draw and write properly.

Plus, they also develop creativity and imagination of course! Other than that, I have observed that art projects improved my child's inquisitiveness and perseverance

Let me end this post by sharing this beautiful quote, from The Artful Parent's page:


(Source)
Like this post? Bookmark it or Pin it for later:

Follow Lique's board Letter of the week preschool art projects on Pinterest.

Hooray for Art!
post signature